Monday, November 11, 2013
Thanksgiving Turkey Wreath
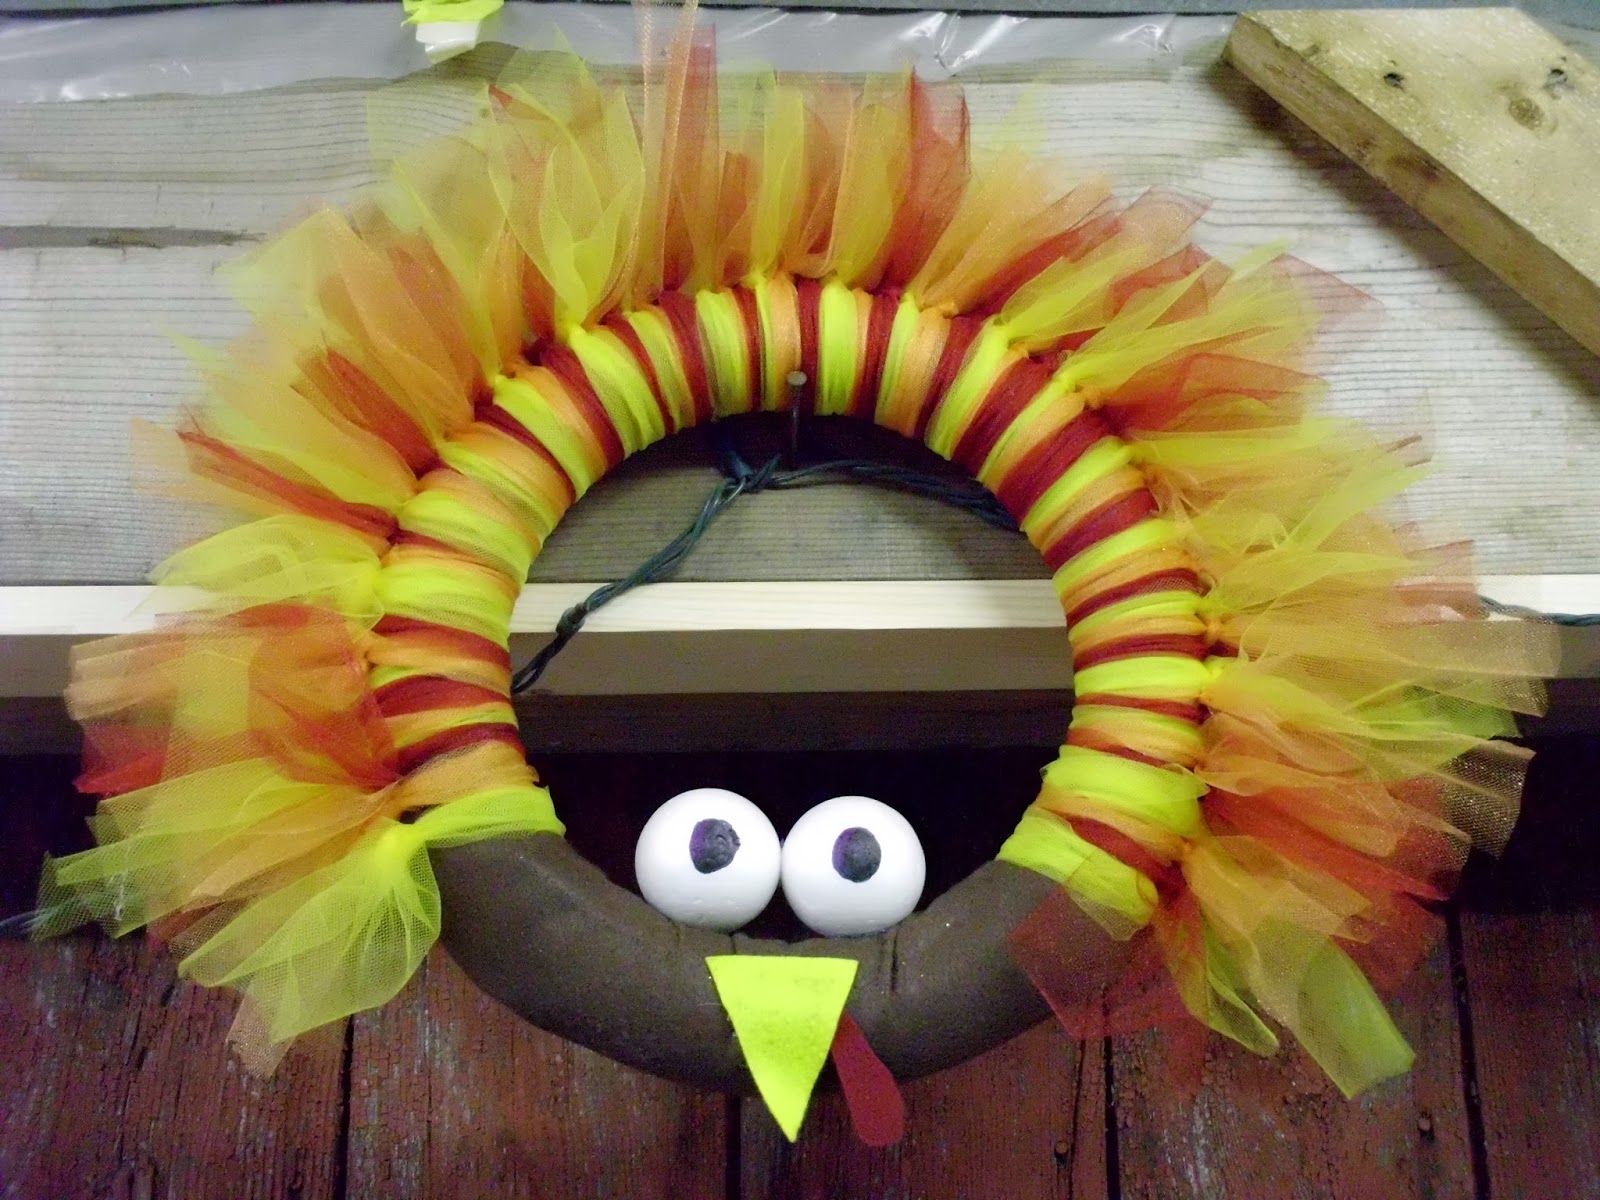
Isn't he cute!? Thanksgiving is one my absolute favorite holidays, and we're already getting ready! For the past 9 years my family has been meeting in the barn at my grandfather's farm for Thanksgiving festivities. My dad and uncle have already been at work clearing tractor paths and splitting wood for the stove. My grandparents had nine children, so aunts, uncles, cousins and friends abound! In addition to the wonderful food there are hayrides (lots of hayrides!), a treasure hunt, movies, a rope swing over the creek and a little bridge for playing pooh sticks. It really is my favorite time of the year. This is year is the tenth anniversary of Thanksgiving in the Barn, so we are all trying to make it extra special. I decided to make some special decorations, and I dropped off this little guy at the barn over the weekend!
I saw a picture of something similar on Pinterest, but there were no directions; just an item that was no longer available on Etsy. However, I recognized the technique from the tutu hair bands we make at dance studio birthday parties. While tying on all the fabric can take a bit of time, its very easy and there is no sewing involved! You just need basic knot tying ability and a hot glue gun.
Thanksgiving Turkey Wreath
Supplies:
foam wreath
brown, yellow, and red felt (I found squares of it at the craft store for 34 cents)
Styrofoam balls
black sharpie
yellow, orange, and red tulle
hot glue gun
1. Wrap the brown felt around the wreath and hot glue into place.
2. Cut the tulle into strips (neatness doesn't count!) and tie around the rest of the wreath, alternating colors. The closer together everything is the more full it will look.
3. Cut a triangle out of the yellow felt and glue on the brown part of the wreath for the beak. Cut the red felt out and glue it on for the waddler. (Is that the technical term?)
4. Draw eyes on the Styrofoam balls and hot glue on the inside of the wreath, on top of the brown section. I glued the styrofoam balls together, and then glued them to the wreath.
5. Hang him up somewhere and enjoy!
This post is linked up on the Craftin Desert Diva's Craft it Up and Link it Up Linky Party and the Krafty Cards etc Thanksgiving Craft link up
Wednesday, October 30, 2013
Applepalooza
Apples, apples everywhere! Lately my family has been canning a myriad of apple products and it has finally come to a close, so now I can share the fruits of our labor with you.
We went to a couple local apple orchards as well as to the supermarket and acquired a large amount of apples in a variety of varieties. Of course at the orchards we also had to sample some freshly made apple cider doughnuts!
We made apple butter, apple sauce, and apple pie in a jar (apple pie filling). We made a lot of apple butter because not only to my husband and I love it, we thought it would be great for Christmas presents. There are many reasons that Fall is my favorite season, and food made with fresh local apples is one of them! For canning new comers, some canning basics can be found here.
The apple sauce and apple butter are my own concoctions, we did some experimenting to see what we liked best. The apple pie in a jar comes from my aunt in the trusty family cookbook. We used a 6 quart slow cooker to make both the apple butter and the apple sauce. To make all the peeling and coring for the butter and sauce easier we used an apple peeling machine which looks something like this:
We went to a couple local apple orchards as well as to the supermarket and acquired a large amount of apples in a variety of varieties. Of course at the orchards we also had to sample some freshly made apple cider doughnuts!
We made apple butter, apple sauce, and apple pie in a jar (apple pie filling). We made a lot of apple butter because not only to my husband and I love it, we thought it would be great for Christmas presents. There are many reasons that Fall is my favorite season, and food made with fresh local apples is one of them! For canning new comers, some canning basics can be found here.

Apple Sauce
Apples - We used a variety called 20 oz. The guy at the orchard said the best apple sauce he ever had was made from these, so we thought we'd give it a try!
Water
Lemon Juice
1. Peel, core, and cut up enough apples to fill a 6 qt. slow cooker. (with the apple peeling machine you can just break them up with your hands.) To keep the apples from browning, every so often toss the cut up apples with some lemon juice.
2. Put the apples in the slow cooker along with 2 cups of water. Turn the slow cooker on low and leave for 10 -12 hours, or overnight.
3. Take half the apples and puree until smooth in a blender. Mash the other half with a potato masher. Mix the two halves back together.
4. Ladle into hot, sterilized canning jars, put on the lid and secure with a ring, and process in a hot water bath for 20 minutes. When the lid pops you know your jar is sealed. Store in the pantry until ready to eat!
This recipe gave us about 2 quarts plus 1 pint of applesauce
Apple Butter
Apples - Our first batch used McIntosh, or final batch used a combination of Wolf's Bane and Wagners.
Apple cider
Brown sugar
cinnamon
nutmeg
cloves
1. Peel, core and cut up enough apples to fill a 6 qt. slow cooker. It doesn't matter if the apples brown because you will add brown sugar and spices.
2. Put the apples in the slow cooker and add 2 cups of brown sugar, 1 cup of apple cider, 1 tablespoon plus 1 teaspoon of cinnamon, 1 teaspoon of nutmeg, and 1 teaspoon of cloves.
3. Turn the slow cooker on low and let cook for 10-12 hours or over night.
4. Blend the apple butter until smooth
5. Ladle the apple butter into hot sterilized canning jars, put on the lids and secure with rings, and process for 15 - 20 minutes. When the lid pops the jar is sealed. Store in the pantry until you're ready to eat!
This recipe gave us about ten 8 oz. jars.
Apple Pie in a Jar
*Apples (tart, crisp apples work best for pie. The recipe suggests Spys or Jonathans, we used Granny Smiths, my husbands favorite.)
-Peel and slice enough apples to fill seven quart jars. We did not use the apple peeling machine for this, we wanted the slices to be more hearty.
*Syrup
5 cups sugar
1 cup cornstarch
2 teaspoons cinnamon
1 teaspoon salt
1/4 teaspoon nutmeg
10 cups water
- cook until think and bubbly, clear. Add 3 tablespoons of lemon juice (we ran out of lemon juice so I skipped this part, it turned out fine.)
-Pour the hot syrup over the apples in the jars. Put on the lids and secure with rings. Process 20 minutes in a water bath. Listen for lid pops. Store jars in the pantry until ready to eat.
- When you are ready to eat pour the apple pie filling into a crust, top with another crust and then follow the pie baking instructions. You could also pour it into a baking dish and top with crisp or cobbler topping!
Friday, October 25, 2013
Ideas for All Saints Day
Can you believe it? All Saints Day is only a week away! Whether you're having a big party or will just be home with your family here are a few ideas for celebrating:
All Saints Cupcakes: These happen to be pumpkin spice cupcakes (spice cake mix with pumpkin puree added) topped with homemade cream cheese frosting. My recipe for the frosting can be found here. I used the adorable images from Happy Saints laminated and hot glued onto small craft sticks as toppers. Of course you don't have to laminate and hot glue, I just wanted people to be able to take them home and keep them if they wanted to. Unlaminated and taped will work just fine. The college students I was cooking for last year loved the cupcakes and the toppers; some of the toppers are still displayed around the church lobby door!
Saints Matching Game: I also used Happy Saints for this. You can find the instructions for making this game here.
Saints, Saints, Who Do You See? - A riff on the classic children's book Brown Bear, Brown Bear, What do you See? by Bill Martin and Eric Carle, this saintly version is a great way to introduce young children to your family's favorite saints and to the concept of how the saints pray for us. If you make your own you can customize it for you family, but Jennifer over at Catholic Inspired has made a free printable version of this project as well. For the printable version click here. To see how I made mine, click here.
Perhaps you're having a party with different activities and snacks themed after specific saints. I have some fun ideas that could work for that too! Click on the name of the recipe/project to get the instructions.
Edible St. Agnes Lambs
St. John the Baptist's Locusts and Honey on a Log
Our Lady of Mt. Carmel Caramel Corn (would also work for any saint who was a Carmelite)

Also good to represent Carmelite saints are these Salted Cashew Caramels (these are easily made into plain caramels by leaving out the nuts and salt)
Angel Food Cupcakes with Blackberries represent St. Micheal the Archangel and/or the other archangels St. Raphael and St. Gabriel

St. Francis of Assisi Pine Cone Birdfeeders
St. Anthony's Lost and Found Fish Cupcakes have a lost gummy fish on the inside that needs to be found! Give everybody a surprise inside, or only put a gummy fish inside one and whoever finds it gets a special prize!
This post is linked up at the Catholic Bloggers Network monthly link up blitz
All Saints Cupcakes: These happen to be pumpkin spice cupcakes (spice cake mix with pumpkin puree added) topped with homemade cream cheese frosting. My recipe for the frosting can be found here. I used the adorable images from Happy Saints laminated and hot glued onto small craft sticks as toppers. Of course you don't have to laminate and hot glue, I just wanted people to be able to take them home and keep them if they wanted to. Unlaminated and taped will work just fine. The college students I was cooking for last year loved the cupcakes and the toppers; some of the toppers are still displayed around the church lobby door!
Saints Matching Game: I also used Happy Saints for this. You can find the instructions for making this game here.
Saints, Saints, Who Do You See? - A riff on the classic children's book Brown Bear, Brown Bear, What do you See? by Bill Martin and Eric Carle, this saintly version is a great way to introduce young children to your family's favorite saints and to the concept of how the saints pray for us. If you make your own you can customize it for you family, but Jennifer over at Catholic Inspired has made a free printable version of this project as well. For the printable version click here. To see how I made mine, click here.
Perhaps you're having a party with different activities and snacks themed after specific saints. I have some fun ideas that could work for that too! Click on the name of the recipe/project to get the instructions.
Edible St. Agnes Lambs
St. John the Baptist's Locusts and Honey on a Log
Our Lady of Mt. Carmel Caramel Corn (would also work for any saint who was a Carmelite)
Also good to represent Carmelite saints are these Salted Cashew Caramels (these are easily made into plain caramels by leaving out the nuts and salt)
Angel Food Cupcakes with Blackberries represent St. Micheal the Archangel and/or the other archangels St. Raphael and St. Gabriel
St. Francis of Assisi Pine Cone Birdfeeders
St. Anthony's Lost and Found Fish Cupcakes have a lost gummy fish on the inside that needs to be found! Give everybody a surprise inside, or only put a gummy fish inside one and whoever finds it gets a special prize!
This post is linked up at the Catholic Bloggers Network monthly link up blitz
Wednesday, October 23, 2013
Salted Cashew Caramels
1 cup butter (no substitutes)
2 cups packed brown sugar
1 cup light corn syrup
1 (14 ounce) can sweetened condensed milk
2 teaspoons vanilla
2 cups packed brown sugar
1 cup light corn syrup
1 (14 ounce) can sweetened condensed milk
2 teaspoons vanilla
chopped cashews
kosher or other coarse salt.
parchment paper cut into squares
1.In a heavy saucepan, combine the butter, brown sugar, corn syrup and milk; bring to a boil over medium-high heat.
2. Cook and stir until a candy thermometer reads 248 degrees (firm ball stage) about 30-40 minutes and for a softer caramel cook just to a few less degrees.
3. Remove from heat; stir in vanilla.
4. Pour the caramel onto a baking sheet lined with a silpat or parchment paper and sprinkle on the cashews and some salt. Allow to cool until its cool enough to work with your hands.
5. Pull off a piece of the caramel and roll it into a ball. Place it into a square of parchment paper. Fold it over the caramel, and then twist the ends to create an individually wrapped candy. Repeat until all the caramel has been wrapped. A bit time consuming, but not difficult. (especially if you have helpers) Enjoy!
Sunday, October 13, 2013
Girly Ballet Cake III
Time for another birthday party at the dance studio, and that means another ballerina cake! This birthday girl mixed it up a little asking for blue, rather than pink to be the main color of her party. I do wonder if I'll ever get to make a hip hop or Irish dance cake though.
I decided that this time I wanted to do a whole ballerina instead of just the shoes. I didn't like how it was turning out when I tried drawing freehand, (thank goodness I use a toothpick to mark things out first!), so I tried a new method I'd never done before.
First, I printed some clip art of a ballerina and put it on top of a piece of poster board, the same one I cut my cake board from. Then I taped waxed paper over top of my picture. I did black first and did the outline and little details like her face and lines on her tutu. Then I filled it in over top of that with the colors for her tutu, hair, and skin. Next I put it all in the freezer to let the frosting harden. After it was hard, I took it out, removed the poster board and flipped the waxed paper over onto the cake. I gently pressed it down a little and proceeded to carefully peel away the waxed paper. It didn't work perfectly, some parts pulled away. I don't know if I didn't freeze it long enough, or my frosting wasn't thick enough, or if my design was too delicate, but I was able to fix it pretty easily. I used my smallest round tip to clean up the borders and details with black, and since the other mistakes were so small, I used a toothpick and leftover frosting to fix those parts. I do want to try this method again and see if I can get it to work even better. The original instructions say to put it on glass rather than poster board so maybe I'll try that next time. For a step by step tutorial of this method with pictures click here.
Girly Ballet Cake 1
Girly Ballet Cake 2
Saturday, October 12, 2013
An Answered Prayer
As some of you may know from my previous post Dating Your Spouse for Free, my family and I have been going through a tough time lately. This included job loss, living with parents, and some health issues. Well, myself, my family, my friends, and even people I've never met who've stopped by the blog have been praying for things to get better, and the prayers have been answered! So thank you to all those who have been praying for my and family; it is greatly appreciated.
I have just been hired as full time 6th grade teacher at a virtual charter school! Going through school I never imagined that I would be an online teacher. Heck, I'm not even sure I knew that virtual grade school existed! I'm still learning how it all works, but my classroom is wherever my home is, and my students can live anywhere in the state. I'm excited about the idea of really getting to work one on one with students and about how involved the parents need to be. I'm also excited to see what kind of flexibility this gives me to spend time with my family. It will certainly save me gas money and there is no commute!
I have this feeling that my 3 year old's prayers had something to do with this new position. While everyone else was praying for a job, he was praying that I could stay home with him all day. I guess this job answers both of those prayers. My grandmother has told me how powerful the prayers of children are. Of course I've explained to him that I will be working and there will be times when I need to be left alone, but any breaks that I take I can spend with my family, and I'm sure there are some parts of my job I can do with him playing in the same room. I just had a conference call meeting with baby noises in the background and our group leader was very upbeat and encouraging about it! And while decorating an office may not be the same as decorating a classroom, I'm excited to get things set up. Since its my personal home office I can put up things like images of St. John Bosco and St. Elizabeth Ann Seton that I wouldn't be able to put up in a traditional public school setting.
In addition to this wonderful news, my husbands health has greatly improved. He was having some major back issues, but the doctor's treatment worked beautifully and he is back to his old self. Praise God!
So thanks to everyone's prayers our family is unstuck and off on a new adventure. I hope to able to post pictures of our first house in a few months!
Saturday, October 5, 2013
St. Francis of Assisi: Books and Birdfeeders
Yesterday was the feast of St. Francis of Assisi, my husband's patron saint! This saint is well loved by children because of his love for animals. At many churches you can take your pet for a blessing on the feast of St. Francis. I remember a time when I was subbing at a Catholic school and saw a little St. Francis activity displayed outside one of the classrooms. Each one had a fact about the saint written on it, and nearly every student picked his love for animals as their fact! This is certainly a wonderful way to get kids interested in St. Francis, especially when discussing him with younger children; but don't forget to go deeper. While his love for nature is a beautiful and good thing, it is more than just enjoying it and thinking its pretty; everything he did pointed toward God!
St. Francis grew up very wealthy and was quite wild when he was young. His interests were in earthly things, not in God. One night he had a dream where God spoke to him and that started his conversion. He eventually renounced all his earthly possessions and lived only for God. He began the Franciscan order, and is often credited with creating the first nativity scene. There are so many amazing stories about St. Francis that I don't have time to talk to about here, which is why I'm going to recommend some books!
Even when there isn't time for a fun recipe or a cool craft, you can always read a book with your children. And while some saint stories may have to be special ordered from Catholic stores, a wide selection of children's books about St. Francis can be found at your local library! (at least at ours anyway.) Most of them are about the legend of St. Francis and the wolf, where St. Francis makes friends with a wolf that has been terrorizing a town, but there are others out there too.
My favorite one for toddlers is the The Song of Francis by Tomie DePaola. You may know him as the author of the classic Strega Nona, but he also has written many stories about saints. Its the story of St. Francis loving God so much that he has to sing, and the angels, and the sun, and the moon, and birds of every color come to join him. Its simple and sweet, and of course DePaola always has beautiful illustrations.

DePaola has another Francis book, Francis, the Poor Man of Assisi that is good for older kids with lots of details about all the different stages and stories of St. Francis' life.
The version of the wolf legend that we read this year was St. Francis and the Wolf by Richard Egielski.
It is well written for a younger audience, but is not dumbed down or made too simple. Children of all ages will enjoy this book as it has a great classic folktale feel to it.
In addition to reading our wonderful stories we also did a little craft. St. Francis is often pictured in art with birds, (that whole loving animals thing!), so we made some bird feeders which are pictured at the top of the blog.
Pine Cone Bird Feeders
Supplies:
Pine cones - open ones work best
Peanut Butter
Birdseed
String or Yarn
Paper plates and plastic spoons and/or knives
-Put a blob of peanut butter on one paper plate, and pour birdseed in another.
-Spread peanut butter all over a pine cone using a plastic utensil, or roll it in the peanut butter.
-Next roll the pine cone in the birdseed.
- Tie a string to the pine cone and go outside and hang it on a tree!
- Opened pine cones work best because it makes it easier to tie on the string. We could only find closed ones in the woods, so we just tied the string around the middle.
I'll leave you with one of my favorite prayers written by St. Francis.
Lord, make me an instrument of your peace,
Where there is hatred, let me sow love;
where there is injury, pardon;
where there is doubt, faith;
where there is despair, hope;
where there is darkness, light;
where there is sadness, joy;
O Divine Master, grant that I may not so much seek to be consoled as to console;
to be understood as to understand;
to be loved as to love.
For it is in giving that we receive;
it is in pardoning that we are pardoned;
and it is in dying that we are born to eternal life.
Learn more about St. Francis here.
This post is linked up at the Catholic Bloggers Network monthly link up blitz , the Equipping Catholic Families Saints Cele-linky and the Catholic and Living It Link Up.
St. Francis grew up very wealthy and was quite wild when he was young. His interests were in earthly things, not in God. One night he had a dream where God spoke to him and that started his conversion. He eventually renounced all his earthly possessions and lived only for God. He began the Franciscan order, and is often credited with creating the first nativity scene. There are so many amazing stories about St. Francis that I don't have time to talk to about here, which is why I'm going to recommend some books!
Even when there isn't time for a fun recipe or a cool craft, you can always read a book with your children. And while some saint stories may have to be special ordered from Catholic stores, a wide selection of children's books about St. Francis can be found at your local library! (at least at ours anyway.) Most of them are about the legend of St. Francis and the wolf, where St. Francis makes friends with a wolf that has been terrorizing a town, but there are others out there too.


DePaola has another Francis book, Francis, the Poor Man of Assisi that is good for older kids with lots of details about all the different stages and stories of St. Francis' life.
The version of the wolf legend that we read this year was St. Francis and the Wolf by Richard Egielski.

In addition to reading our wonderful stories we also did a little craft. St. Francis is often pictured in art with birds, (that whole loving animals thing!), so we made some bird feeders which are pictured at the top of the blog.
Pine Cone Bird Feeders
Supplies:
Pine cones - open ones work best
Peanut Butter
Birdseed
String or Yarn
Paper plates and plastic spoons and/or knives
-Put a blob of peanut butter on one paper plate, and pour birdseed in another.
-Spread peanut butter all over a pine cone using a plastic utensil, or roll it in the peanut butter.
-Next roll the pine cone in the birdseed.
- Tie a string to the pine cone and go outside and hang it on a tree!
- Opened pine cones work best because it makes it easier to tie on the string. We could only find closed ones in the woods, so we just tied the string around the middle.
I'll leave you with one of my favorite prayers written by St. Francis.
Lord, make me an instrument of your peace,
Where there is hatred, let me sow love;
where there is injury, pardon;
where there is doubt, faith;
where there is despair, hope;
where there is darkness, light;
where there is sadness, joy;
O Divine Master, grant that I may not so much seek to be consoled as to console;
to be understood as to understand;
to be loved as to love.
For it is in giving that we receive;
it is in pardoning that we are pardoned;
and it is in dying that we are born to eternal life.
This post is linked up at the Catholic Bloggers Network monthly link up blitz , the Equipping Catholic Families Saints Cele-linky and the Catholic and Living It Link Up.
Sunday, September 29, 2013
Feast for the Archangels
Today is the feast of St. Michael, St. Gabriel, and St. Raphael the Archangels! This feast was one of the first times I tried a special Catholic celebration with my family, aside from things like Advent, Christmas, Lent and Easter of course. Instead of my usual written summary of today's saints, I encourage you to watch the video below which was made by seminarians in Detroit. These are our future priests people! And I'm okay with that.
For our meal we had a few things that were generally angelic, and a few things specific to each angel.
Angel Hair Pasta with Carrot Cream Sauce
The carrots represent St. Raphael because he cured Tobit's eyesight.
1 box angel hair pasta
1 bag baby carrots
1 jar alfredo sauce
1. Heat the oven to 350 degrees. Toss the carrots with a little bit of vegetable oil and roast until soft, about 45 minutes to an hour.
2. Move the cooked carrots into a blender or food processor and add some water. Blend until smooth.
3. Stir together the carrot puree and the alfredo sauce. Serve over cooked angel hair pasta.
St. Michael's Grilled Skewers
The skewers represent St. Micheal's sword. We used bamboo, but metal ones would look more like swords.
Put whatever meat and veggies you like onto skewers and grill until done. Simple! We used steak, shrimp, broccoli, bell peppers, and yellow squash.
Angel Food Cupcakes with Blackberries
Blackberries are a traditional food associated with St. Michael due to a legend about Satan landing in a bramble bush when he was banished from heaven.
1 1/4 cups flour
1 1/2 cups sugar
12 egg whites
1 1/2 teaspoons cream of tartar
1/4 teaspoon salt
1 1/2 teaspoons vanilla
1. Combine egg whites with cream of tartar, salt, and vanilla. Whip until you have medium peaks. Sift the flour and sugar and gently fold them into the egg whites.
2. Scoop the batter into a cupcake tin lined with paper wrappers. Bake at 350 degrees for 20 to 35 minutes. Cool and serve with whipped cream and blackberries.
Sadly I didn't have anything St. Gabriel specific, but lilies are a traditional symbol for him, so having some for a centerpiece would be nice, though lilies are hard to find in the fall. You could also write out the menu on a banner or, as my husband suggested, put out a bowl of Bugles! Our son colored an Archangel coloring page from happysaints that you can find here.
St. Raphael grant us healing! St. Gabriel bring us good news! St. Michael defend us against our enemies!
This post is linked up at the Catholic Bloggers Network monthly link up blitz, the Equipping Catholic Families Saints Cele-linky and the Catholic and Living It Link Up.
For our meal we had a few things that were generally angelic, and a few things specific to each angel.
Angel Hair Pasta with Carrot Cream Sauce
1 box angel hair pasta
1 bag baby carrots
1 jar alfredo sauce
1. Heat the oven to 350 degrees. Toss the carrots with a little bit of vegetable oil and roast until soft, about 45 minutes to an hour.
2. Move the cooked carrots into a blender or food processor and add some water. Blend until smooth.
3. Stir together the carrot puree and the alfredo sauce. Serve over cooked angel hair pasta.
St. Michael's Grilled Skewers
Put whatever meat and veggies you like onto skewers and grill until done. Simple! We used steak, shrimp, broccoli, bell peppers, and yellow squash.
Angel Food Cupcakes with Blackberries
Blackberries are a traditional food associated with St. Michael due to a legend about Satan landing in a bramble bush when he was banished from heaven.
1 1/2 cups sugar
12 egg whites
1 1/2 teaspoons cream of tartar
1/4 teaspoon salt
1 1/2 teaspoons vanilla
1. Combine egg whites with cream of tartar, salt, and vanilla. Whip until you have medium peaks. Sift the flour and sugar and gently fold them into the egg whites.
2. Scoop the batter into a cupcake tin lined with paper wrappers. Bake at 350 degrees for 20 to 35 minutes. Cool and serve with whipped cream and blackberries.
Sadly I didn't have anything St. Gabriel specific, but lilies are a traditional symbol for him, so having some for a centerpiece would be nice, though lilies are hard to find in the fall. You could also write out the menu on a banner or, as my husband suggested, put out a bowl of Bugles! Our son colored an Archangel coloring page from happysaints that you can find here.
St. Raphael grant us healing! St. Gabriel bring us good news! St. Michael defend us against our enemies!
This post is linked up at the Catholic Bloggers Network monthly link up blitz, the Equipping Catholic Families Saints Cele-linky and the Catholic and Living It Link Up.
Saturday, September 21, 2013
St. Andrew Kim and Our Lady of Namyang
*Update 9/30/13 - My dad sent me some more pictures of the life size rosary mysteries and stations of the cross. Enjoy!
I know that St. Andrew Kim's feast day was yesterday. I was hoping to cook some Korean food like bulgogi or bibimbop (they're so fun to say!), but this past week was crazy and I couldn't get it done. St. Andrew Kim was the first Korean Catholic priest, and was martyred along with many other Korean Christians during persecutions in the late 1800s. To learn more about St. Andrew Kim, click here.
Although I was not able to get my cooking done, I still have something special to share. A few years ago my dad went on a trip to Korea for the military, and he was able to visit Mirinae, which is the valley the Christians fled to during the persecution. Here he got to visit St. Andrew Kim's grave, and there is a shrine for all the martyrs. Dad also says that they had some life size depictions of the mysteries of the rosary here. These are just a few of the pictures he took, though he might send me some more later.
He also got to visit the Shrine of Our Lady of Namyang, (pronounced Nahm Young). Here they have a twenty decade rosary road; a nature trail lined with large granite spheres for rosary beads so you can pray as you walk along. My grandmother has a small version of the statue of Our Lady of Namyang in her kitchen that my dad brought back for her. It is truly a remarkable, beautiful, and inspiring place. These pictures are not my dad's, but are from the internet. St. Andrew Kim and Our Lady of Namyang, pray for us!
I know that St. Andrew Kim's feast day was yesterday. I was hoping to cook some Korean food like bulgogi or bibimbop (they're so fun to say!), but this past week was crazy and I couldn't get it done. St. Andrew Kim was the first Korean Catholic priest, and was martyred along with many other Korean Christians during persecutions in the late 1800s. To learn more about St. Andrew Kim, click here.
Although I was not able to get my cooking done, I still have something special to share. A few years ago my dad went on a trip to Korea for the military, and he was able to visit Mirinae, which is the valley the Christians fled to during the persecution. Here he got to visit St. Andrew Kim's grave, and there is a shrine for all the martyrs. Dad also says that they had some life size depictions of the mysteries of the rosary here. These are just a few of the pictures he took, though he might send me some more later.
![]() |
Grave of St. Andrew Kim |
![]() |
Statue of St. Andrew Kim |
![]() |
St. Andrew Kim chapel |
![]() |
Shrine Church of the Martyrs |
![]() |
Near entry to Shrine at Mirinae Valley |
![]() |
Joyful mystery - The Nativity |
![]() |
Joyful mystery - The Presentation |
![]() |
Life size stations of the cross |
He also got to visit the Shrine of Our Lady of Namyang, (pronounced Nahm Young). Here they have a twenty decade rosary road; a nature trail lined with large granite spheres for rosary beads so you can pray as you walk along. My grandmother has a small version of the statue of Our Lady of Namyang in her kitchen that my dad brought back for her. It is truly a remarkable, beautiful, and inspiring place. These pictures are not my dad's, but are from the internet. St. Andrew Kim and Our Lady of Namyang, pray for us!
![]() |
The Rosary Road at Namyang |
![]() |
Entrance to the rosary road |
![]() |
Statue of Our Lady of Namyang This post is linked up at the Catholic Bloggers Network monthly link up blitz |
Sunday, September 8, 2013
Mary's Birthday Pancakes

With the new job we decided to make sure that our family has a nice Sunday breakfast together after our new earlier mass time, so we dressed up our pancakes for this special birthday celebration. I just used my basic pancake recipe from the family cookbook, added blue food coloring, and layered them whipped cream. You could also layer them with some simple cream cheese frosting. You can find my recipe for it here. I also have some recipes for blueberry muffins and Marian jello cups that would work well for today. In the past I shared my recipe for whole wheat pumpkin pancakes, which bump up the health factor, but due to their golden color would be difficult to make blue.
Make sure you sing Happy Birthday to Mary (kids love this part!), and say a Hail Mary or other Marian prayer together as a family.
1 egg
1 cup milk
2 Tablespoons vegetable oil
1 cup flour
1 Tablespoon sugar
1 teaspoon baking powder
1/2 teaspoon baking soda
1/2 teaspoon salt
Beat the egg and mix all the ingredients together until smooth.
Grease a hot griddle or pan. Drop batter onto the pan with a large spoon. When bubble form on the top they are ready to flip. If you want to add any extras like berries or chocolate chips, add them in while they're on the pan, but before flipping.
*Update: We won a cake at the parish picnic cakewalk so ended up with cake anyway!
This post is linked up at the Catholic Bloggers Network monthly link up blitz , and the Equipping Catholic Families Saints Cele-linky
Subscribe to:
Posts (Atom)