Wednesday, July 29, 2015

California Roll Pasta Salad

Ahh, pasta salad. Its the perfect thing to have in your fridge during these hot summer days. Make it ahead of time, (in the evening when its cooler), and it will be ready to go when you're hungry but don't want to cook because of the heat. I love throwing some into a small container to take with me for lunch at the park.

My go-to pasta salad has been a summer seafood pasta salad; noodles mixed with cherry tomatoes, tri-color bell peppers, imitation crab, and Italian dressing. Say what you want, but I love imitation crab in pasta salad! One day when I was thinking about this my thoughts wandered over to California rolls. When I was pregnant it was some of the only sushi I could eat since most places use imitation crab which is not raw. I wondered, could I put the flavors of a California roll into a pasta salad? It turned out I could, and it was delicious! Creamy avocado dressing, crunchy vegetables, and soft imitation crab all rounded out with the flavors of sesame and soy, it was a pasta salad like none I had ever tried before.  I think this cool and refreshing take could be my new go-to pasta salad!


California Roll Pasta Salad
This is the type of recipe I don't really measure for, so amounts are approximations. Do whatever you think will taste good! I used a store bought avacado ranch dressing, but the soy sauce really helps to mellow any ranch flavor out. 

1 box short noodles like penne or rotini ( I used a veggie infused pasta made with zucchini and spinach)
Avacado ranch dressing (or other avacado based dressing.)
1 large cucumber
2 handfuls baby carrots, or one large carrot
1 -2 packages flake style imitation crab
soy sauce
sesame seeds

1. Cook the pasta, drain, and let chill in the fridge.
2. Seed and dice the cucumber and dice the carrots.
3. Add the vegetables, imitation crab, and approximately 1/2 bottle of the avocado dressing to the cold pasta. Add a few splashes of soy sauce and a sprinkle of sesame seeds and mix.
4. Return to the fridge to let it chill and have the flavors meld more, or enjoy it right away! You could even chop and sprinkle some nori on top if you felt so inclined.


Friday, July 24, 2015

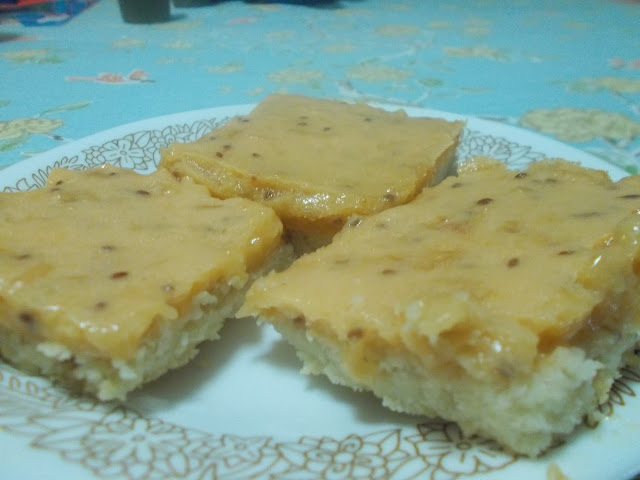
Gooseberry Bars

Move over lemon bars, there's a new kind of fruit bar in town! (Don't worry lemon bars, I still love you too.)


Let me introduce you to flavorful, tart and sweet gooseberry bars! Until last year the only thing I knew about gooseberries was that my Uncle Matt got one stuck in his nose when he was a kid at his grandmother's house.

Matt: Grandma, I think I have a gooseberry up my nose.
Grandma: What do you mean you think you have a a gooseberry up your nose!? You know darn well you have a gooseberry up your nose!


Well, several years back I got my dad a gooseberry bush for his abundant backyard garden. It didn't really produce anything. He bought a few more to go with it. Some berries grew, but a deer ate them. The gooseberry bushes became quite the ordeal over years! Sorry Dad! Well, finally last year it became all worth it as the bushes have now been covered in delicious gooseberries for the past two summers. They are excellent for jam, pie, and of course the bars.

Gooseberry Curd
I'm not sure how I would describe the flavor of a gooseberry, it's kind of like describing how beef tastes to someone who has never had it before. Beef tastes like beef, gooseberries taste like gooseberries. They are quite tart, but also have a great flavor. If you like sweets made with lemons or rhubarb, I think you would also be a big gooseberry fan.

In fact, I based this recipe off of one I found for rhubarb bars, which, by the way, are also quite excellent.

The first step in making the bars is making one of my favorite things, curd. Yummy, creamy, luscious fruit curd. Yes, making desserts with fruit curd is amazing, but I'm often tempted to just eat it all with a spoon before I get around to doing anything else with it. If you use your gooseberries right away, you should have a light greenish-yellow colored curd. I waited a while after I picked them and some of my gooseberries started to ripen, so I ended up with an orangey-peachy color. They do get a little sweeter as they ripen, but they have a better flavor green. Then all you need to do is pour the curd onto a shortbread crust, bake, and cool.


 You will notice that  gooseberries have a little brown "stem" on each of them. I think it is what is leftover of the flower. These need to be taken off before you cook with them, which can be kind of a pain and take a while, but if you have some good company to have a conversation with or a good movie to watch it's not so bad. I just used a pair of nail scissors to snip each one off.


Gooseberry Bars

To prepare the gooseberries:

Combine 2 cups of cleaned gooseberries in a saucepan with 1/3 cup of water and 1/4 cup of sugar. Let it cook down until berries are soft and given off a lot of liquid. (Think of the first stage of making jam.)

For the curd:

6 egg yolks
3/4 cup of sugar
a pinch of salt
3 1/2  Tbsp butter, cut into small chunks
2 cups prepared gooseberries

In a double boiler whisk together the egg yolks, sugar and salt.
Add in the gooseberries and continue whisking.
Remove from heat, and the butter pieces one at a time, whisking as you go.

You can stop here and use the curd on cake, scones, biscuits, or just a spoon. Continue with the crust if you want to make bars.

For the crust: 

1 stick of butter - room temperature
1 cup of flour
1/4 cup of sugar
a pinch of salt

Mix ingredients in a bowl until it resembles course crumbs. Press into an 8 x 8 baking dish and let rest for 15 minutes.

Putting it all together

Bake the crust at 350 degrees for 20 minutes.
Remove the crust and pour on your gooseberry curd. Bake for another 10 minutes. Remove the bars from the oven and let them cool before serving.

Make sure you have some sort of party or gathering to bring them to so you don't eat them all yourself! (Or if you want them all to yourself, make sure you hide them!)

Bonus - bars are much harder to stick up your nose than just a gooseberry itself. (Though I wouldn't put it past some kids to give it a try!)

Tuesday, July 21, 2015

Three Recipes for the Feast of St. Kateri


 The feast of St. Kateri Tekakwitha, the first Native American to be named a saint, was on July 14th. She lost her parents to small pox when she was child, and her face ended up scarred from the disease herself. When she was older, she learned about Christianity from visiting missionaries and converted. Persecuted by her tribe for becoming a Christian, she made the 200 mile journey to a village where she would be safe. She liked to make crosses out of branches and leave them in the woods to remind her to stop and pray. She was very devoted to the Eucharist. She fell ill and died when she was only 24. When she died, all the scars disappeared from her face. She is the patron of the environment and people persecuted for their faith. Learn more about St. Kateri here.

For her feast day this year I tried making a couple more authentic Native American dishes, and also a a sweet treat. Sharing a meal together is a great time to talk and learn more about St. Kateri and how we can follow her example to lead a holy life. For the authentic dishes I started with something as simple as, "St. Kateri might have eaten something like this for lunch after mass!"

The two more authentic dishes are a summer three sisters soup, and fry bread. Kateri was a Mohawk. While there was some hunting and gathering, they were largely agricultural. The bulk of their diet was made up of the three main crops they grew; corn, squash, and beans. These crops were so important to their livelihood they referred to them as "the three sisters."  They planted them strategically in the same field so each crop helped the others grow better. There is probably a great analogy in there somewhere if I took the time to think of it. There is at least a great science and history lesson in there for those of you who homeschool! (or even if you don't!)

All the Mohawk corn soup recipes I came across were very hearty, using hominy and winter squash. I just felt that it was too heavy for the middle of the summer, so I put together a version using summer vegetables, replacing the hominy with sweet corn, and  the winter squash with summer squash and zucchini. It was also the first time I made anything with my own homemade vegetable stock, yum!

The other authentic recipe I tried was fry bread. A couple years ago I experimented with a corn version, since cornbread was a big part of the native american diet. This year I followed a recipe I found to the letter. Not only was it simple, but it was delicious. I think it is a great way to make bread for a meal quickly, and without having to turn on the oven, which is nice in the summer! I just wish that I could try some fry bread made be someone who really knows what they're doing so I could know if I'm getting it right. But even if mine wasn't perfect, it sure was tasty!

For the sweet treat I knew I wanted to make turtles, as Kateri was part of the turtle tribe. At the famous Cross in the Woods here in Michigan, there is a statue of St. Kateri with turtles all around the base. The only issue with turtles was I knew my son wouldn't eat pecans or any other nut I used to make them, so I went a little crazy and used my recipe for peanut butter playdough as the base instead. Now that was a good idea! I basically ended up making a homemade caramel Reese's cup, No could tell me that there is anything wrong with that sentence! I had never thought of pairing peanut butter playdough with chocolate like that before, now I think I'll be doing it every chance I get!

Summer Three Sisters Soup
Very simple to put together - nutritious too! Use vegetable stock to make it a vegetarian dish.

Vegetable or chicken stock
Fresh, frozen, or canned sweet corn
1 can kidney beans
1 zucchini, diced
1 summer squash, diced
salt and pepper

Combine ingredients in a pot and simmer until hot. I told you it was simple!


Indian Fry Bread (recipe from nativetech.org)
Simple and fast, fry bread was essential for Native American peoples being forced to move from place to place. Though delicious on its own, today many people top it with things like honey or cinnamon sugar, and even use it to make pizza and tacos!

1/2 teaspoon salt
1 tablespoon baking powder
3 cups flour
1 cup warm water

 Combine all of the dry ingredients in a large bowl. 
Add warm water in small amounts and knead until soft but not sticky. 
Adjust the flour or water as needed, Cover aand let stand 15 to 20 minutes. 
Pull of large egg sized balls of dough, turn out into fairly thin rounds. 
Fryrounds in hot oil until bubbles appear on the dough, turn over and fry on the other side until golden brown. 


Peanut Butter Turtles
Your own homemade Reese's candy, with a little caramel added. I used dark chocolate. After melting the caramel I was worried it would  be impossible to clean the bowl I used, but a simple soak in hot soapy water did the trick beautifully!

Peanut Butter Playdough  - mix a little honey into some peanut butter and add dry milk powder until it reached a playdough consistency.
Caramels
Chocolate chips

Grab balls of peanut butter playdough and mold into turtle like shapes.

In separate bowls, melt the caramel and chocolate chips in the microwave. Drizzle a little caramel over each turtle, followed by the chocolate. Put in the refridgerator or freezer to allow the caramel and chocolate to set up.

I recommend serving them at room temperature due the stickiness of the caramel. Serving them too cold may make the caramel too hard to eat.


"Who can tell me what is most pleasing to God that I may do it?" - St. Kateri Tekakwitha


St. Kateri, pray for us!

Related Posts Plugin for WordPress, Blogger...